Thursday, December 22, 2011

Impromtu

My family like many has a lot of birthdays in November.  Makes sense when you think about it. . . Valentines Day and all that.  All the same some how each birthday seems to creep up on me.  I know they are coming but they just keep coming.  About a week ago I heard my brother was coming into Raleigh to hang out, so I went over an spent some time with him.  Not much time since he came into Raleigh to play golf.  While he was away my nieces and I hatched a plan: an impromptu b'day celebration.  Seeing as somehow we were stranded without a car we had no choice but to use what we had.  This was our creation.  With the use of tissue paper, paper, the two candles in the house and the baking goods we could find this is what we came up with. . . whatcha think?


The cakes looked a bit funny but tasted great, they were crushed pineapple and strawberry upside down cakes.  In the end my brother was surprised and the cakes were crushed.

Tuesday, December 20, 2011

Grout, seal, paint

Next step is grouting!

It is very important that you keep the grout on the wet side.  If the grout is too dry the grout will dry out and crack... not a good thing if you couldn't guess.

These are the tools you will need.

Rubber Gloves
Grout Float
Something to scoop out the grout out.


All you have to do is use the float across the tiles pressing down into the cracks and scrape off the extra pushing it to other cracks still needing to be sealed in.  Use the rounded counter to scrape edges to give a bit of a divot.


After a 24 hours of drying  (do not walk on it) it is time to seal the grout.  We used a simple spray can as our sealant but there are many options. 


Next stop prepping the walls!


Where the wall has bumps and divots it has to be fixed before painted.

I use a puddy knife to remove bumps on the wall.
Do any sanding that is needed and wipe walls before trying to puddy in holes.


After the puddy has dried sand anything thing that is necessary and then wipe down the walls again before starting to paint.


Personally I like to start with the edges.  The key of edge work is patience.  You can use the special tools specifically used for edges or tape but I prefer to go slowly cause both tape and the edging tools leave a line of unpainted wall.


First layer down and more to go

Thursday, December 15, 2011

Repurpose and reuse

I am super cheap/tight... this is in every aspect of my life: including house decor.  I am always looking for a neat but cheap way to spruce up the place.  Today's escapade: Jars.

I always have a million jars that are left from spaghetti sauce, jam, you name it.  I don't recycle (I know the horror!) for three reasons 
1. I have to pay for it
2. The recycling process actually depletes the ozone layer
3.  I like re-purposing things

So this is my use of it for now: one is for my sister's wedding but for now I will use them as a centerpiece, candle holders and glasses

Super easy: mainly takes patience to get all the goo off... and thus I use Goo Gone 


Tuesday, December 13, 2011

Tiling All By Myself, Don't want to be. . .

So the first time we decided to tile I was intimidated but this time I was even more so if that is possible.  Chris was away and it needed to be done so I had to do it by myself and figure out how to cut a circle into what is essentially a rock.  I don't do well when there isn't someone there to get opinions from.  But I marched on and it was much MUCH more simple then I thought it would be.

Sweep off the durrock make sure there are no stray dirt or clumps of any kind


Make sure you have a wet saw with diamond blade waiting ready to roll, we got ours for like $50 when it was on sale.


With a space as small as our bathroom you can start on one side of the room and then move across to the other, in larger rooms you need to start in the middle and work out in quarters of the room.  I laid out all the tiles and measured out and marked all the tiles I would need to cut.


After cutting all the tiles to the right size I laid them all out again to make sure that they fit well then I pulled them up in lines and moved to mix the mortar.  The directions are on the bag you buy but basically mix and mix and mix.  You're better to go on the watery side then dry side... too dry and your tile won't stick... then again too wet and it won't stick either.  Basically it should be more wet then the texture of cookie dough but not as thin as egg nog?  I don't know if that helps


I found that doing different strokes was more fun then straight lines.  Online they said it was better for making the tile stick but nothing to prove it... so you can judge fro yourself.

When you place the tiles down evenly distribute some of your weight onto the tile so that it is fully pressed into the mortar.

Make sure to place spacers down around each tile to keep the spacing you want.


Jumping back to when you cut, cutting the circle with our wet saw is basically a long patient process.  You have to cut out sections and then use the blade to almost sand off the really uneven pieces.


When you are mixing the mortar and the grout I would suggest wearing a mask for the dust... not fun to breath in


I finished the whole project, working fairly slow, in about 3 hours.

Don't worry if the mortar got on the tile when it dries it will be easy enough to get off.  I used a plastic fork and a damp sponge and was done cleaning it off in less then 10 minutes.  But before trying to clean it off let it sit for at least 24 hours or your weight could mess up the tiles.


Almost there... 

Thursday, December 8, 2011

Simple decor for the holidays

  This is a great example of my super talented sister in law.  Simple white plates on a simple Christmas-ish table cloth with small apples for a color pop.  Takes only moments but adds so much.  Then it is not just for Thanksgiving: A Thankful Tree.  It is a simple centerpiece that is not only great for the eye but also great for a reminder of keeping a positive thought process.  Take some bare branches fallen or off the tree and make them all about the same length and get some clothes pins and paper... and your pretty much done and it is simple yet looks great!


Sponsored by: 
Gussy Sews Inspiration Workshop!

Tuesday, December 6, 2011

Ready to renovate your bathroom!?

I have posted about this bathroom before and now I have done something about it and I'll show you what and how to do it!

This is what the bathroom looked like when we moved in.
Original cabinet and toilet.
Base paint the only paint on the walls.
Peeling linoleum floors.

I will show you how we gutted and rebuilt our bathroom including tiling the floor step by step with instructions!

So here is day one of what turned into one awesome bathroom!

Step one I sold the old toilet and cabinet/sink/faucet on Craigslist.   Not for much but I got paid, they got a cheap cabinet to redo or use in a shop and they hauled it away!  BTW when you pull out the sink and toilet you will want to stuff the drains with something or it will reek.

Next step: pull up the quarter round and base board then the floors! 

I used a hammer, chisel, right angled crow bar and a flat head screw driver.  My goal, and it was achieved, was to be able to reuse the materials. I found it easiest to work from a corner then go out towards the middle of the baseboard/quarter round.  I used a chisel or flat headed screw driver to get the piece away from the wall enough to get the crow bar in and gently and slowly made my way down the piece.  DO NOT pull hard. If you do then the piece you are working on will snap, especially with quarter round.  It is a slow process but since I don't have the tools to be able and make my own new set of trim it saved me TONS!


Pulled off the cover to the electrical light socket.  I left the base for now because I knew this process would take more than one day.


One thing you always have to check for in any room, when water is involved, is water damage.  This looked bad but we had it looked at and our "guy" said that it was just stained but no damage to the wood.


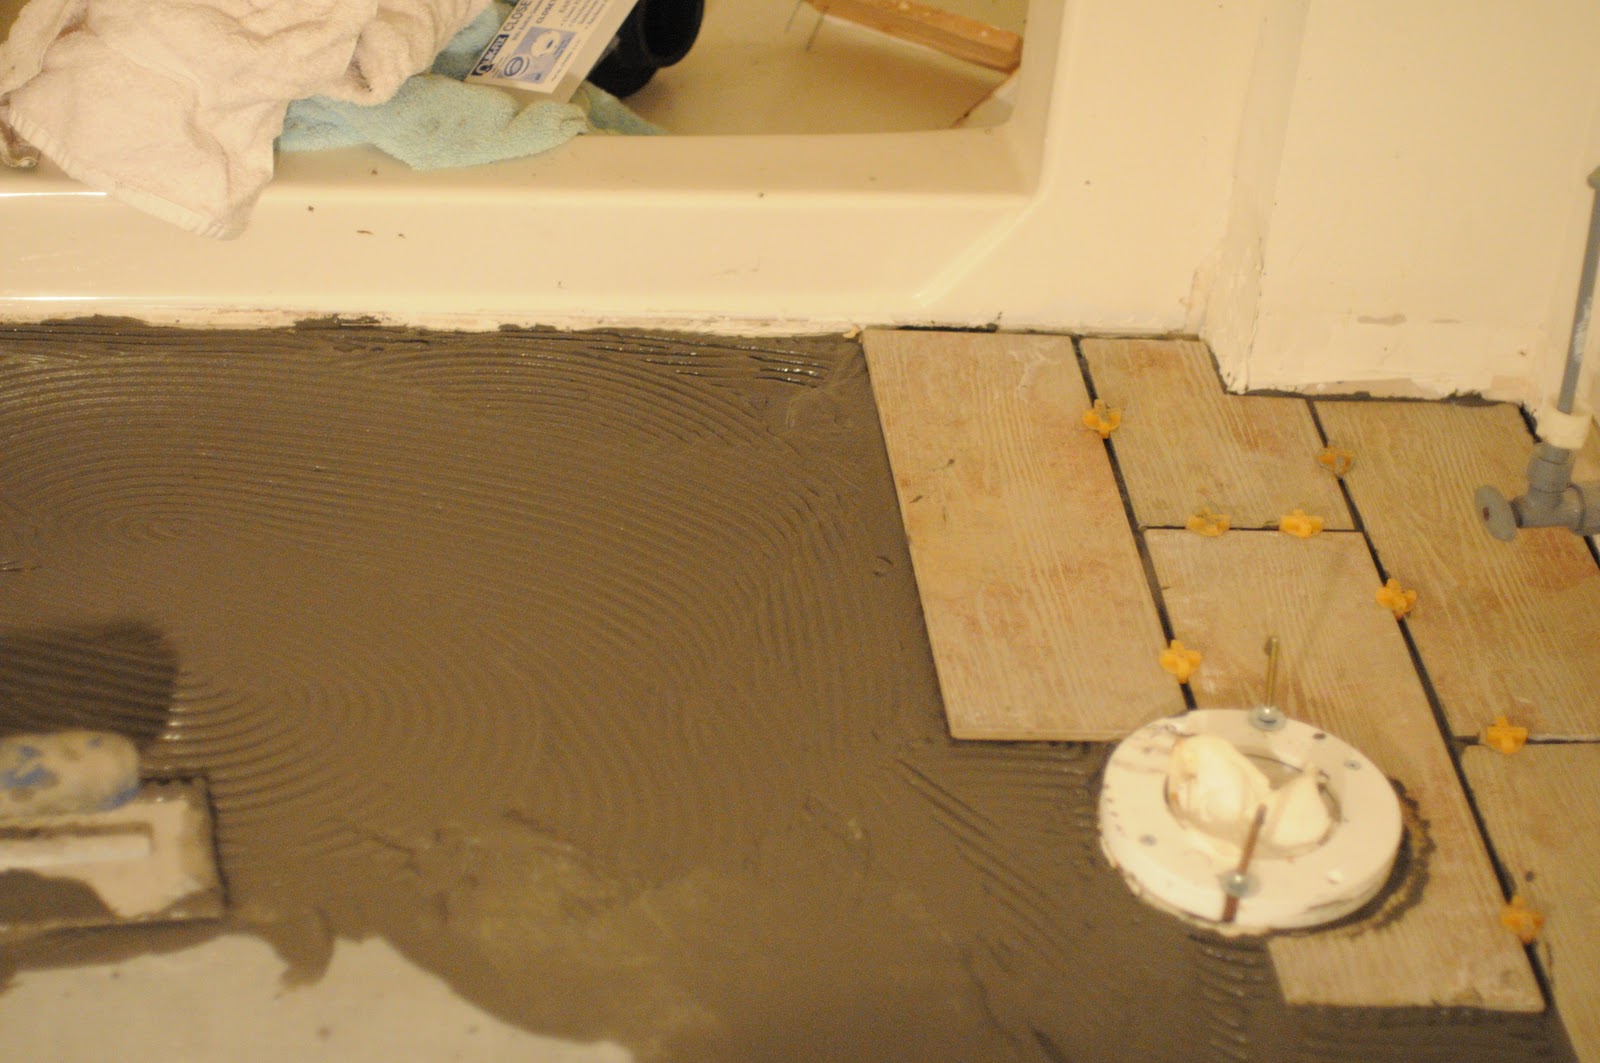
Next step I cleared off the base boards as much as possible.  I actually vacuumed after I swept. It is really important to have no debris on the floor for this next step: putting your Durrock down. (You may have to get a toilet extender flange)

Before you put your Durrock down you need to measure the room.  Every divot and corner.  I drew a not to scale picture of the room and marked what each little part was next to where it was depicted on the crewed drawing.  The hardest part about this is actually the toilet hole but if you have a string it isn't too bad.  Measure away from the wall to the plastic toilet ring flange (the white plastic part surrounding the actual hole) and from the other side of the flange to the other wall. This gap in distance gives you the diameter and half it and you get the radius/the length you should make your string.  (ex: if the full length of the room is 15 ft and on one side of the flange is 18in and the other side of the flange is 13ft you can know that the diameter is 6in and the radius is 3in)  Tie a string around a marker measure out the radius length and add a bit more room (rather over cut then under, believe me!) and cut it off.  Measure off the distance from the wall to the flange then add the radius length to that and you know where to hold down the string! Draw a circle!

Now to cutting.  All you need is a box cutter.  Mark your areas score them and break it off (remember during the process of moving your Durrock around that if you bend it, even a little bit, and it gets any sort of not  perfectly straight look about it you can't use it).  With the circle cut: OVER cut.  In this case bigger is almost always better ;P


Now lay your pieces out and screw them down with these bad boys.  I put one in about every 15 inches.


Let them sit over night and then screw them down as far as possible.  If one won't go down remove it and screw in a new one.


Next step use all purpose wall puddy over the screws to make the areas flat again and puddy in any holes or gaps you might have.


Next use all purpose puddy tape between the different pieces on the seems.  They sell durrock tape but you can use just regular wall tape as well, works just as well.  Put down a bit of the puddy lay the tape and then more puddy try and get it as level as possible.


After this long busy day enjoy some rest before you get back to work tomorrow!