Tuesday, February 14, 2012

Life never seems to get boring.

I love how you don't know what is coming next.  All of our marriage, Chris' parents have lived hundreds to thousands of miles away and so we would only get the chance to see them a couple times a year for longer time periods.  Which builds a different dynamic in a relation ship then say the relationship with my parents who we see more frequently but only for a day or part of a day (they live a couple hours away).  Both dynamics are interesting but so completely differently and not just for distance but also for the "cultures" in each family.

Now for the first time, Chris's parents will be living about the same distance away as my parents.  We have a dynamic change happening (get it... the double reference to dynamic... I blame Chris and his puns for that).  So we went up recently to help unload some boxes and try and not do any damage while we were there, I tend to be a bit clumsy.

It was great to see their house unfolding from the empty walls and rooms to a place filled with the things that make up a day to day life.  To watch as Chris' mother opens up a box and pulls out a ceramic that her daughter made her in elementary school.  As she unloads for what will be at least the last time for a while, the stack of small frames filled with the once babies of her family that have lined her every kitchen.

It's nice to see a glimpse of what's next.


Sponsored by: 

Thursday, February 9, 2012

BUWah HA ha


An evil laugh escaped my lips when I received Gussy Sews prompt for this week.  "You played right into my hand!"  I mused to myself looking around directly afterwards aware of how bizarre my behavior must have looked fingers drumming away in anticipation. 


Organization.  Makes me want to Oooo and Aahhh.  I'm pretty sure the rows and rows of plastic, basket and wood organization products was designed just for me (and only me ;P).  Organization is beautiful order in an otherwise hectic and crazy world.  It is the math of the household. You know what I mean.  In math: 1 +1 always  =2.  Cooking is like the spelling of the household: HAHA we tricked you into thinking their are rules!

It is for the rules that I love organization a little too much.  My husband has banned me from buying a label maker.  I told him it would be the best 16 hours I would ever spend.  "16 hours???  See that's what I mean, no label maker for you"

But alas without my label maker I still make due and have a lovely design for everything.  Chris tries to help me put things away.  I just have to smile, for I know that as soon as he is finished I will go back and put them were they "should" go.  I have told him but it only makes sense in my crazy crazy mind I guess.

If I were allowed everything would have it's place, a 0' 0' 0' 0' as Sheldon would say.  But then again my life wouldn't be as much fun if I didn't have a little crazy... I mean really who leaves books on the coffee table?  Crazy talk ; P

Gussy Sews Inspiration Workshop!

Tuesday, February 7, 2012

Jump off the bridge?

Why are one handle bathroom faucets so popular?  I mean really, is there something I am missing?

I want to replace my faucet head (well it isn't really replacing it if it doesn't already have one, so I guess "get" would be a better word), but as I look over the options there are very small amounts of 2 handled options.  I have used a great many showers between travel, friends and family and I do not care whether the shower has 2 handles, 6 handles or one.  So long as the water turns on and it is easily tweaked (I hate barely turning the knob only to get burned or frozen).

In the greater world that is not me: 

What is so great about a one handled shower?

Is it worth the effort to change?


Sponsored by: 

Thursday, February 2, 2012

Dragged down by my own accord


There is something about redoing a house leaves you feeling incomplete to a degree.  Despite having finished all but two rooms of our house I still feel like the list is never ending.  It doesn't help that once you are in the mindset of looking for projects... the lists don't stop.  The items may get a great deal smaller but they still exist.

How to live with an ever present project? 

I like to view it as a hobby.  Do it when necessary and when you want to have fun, feel accomplished!  Now that will leave some lag in between projects but it is worth it to not get bogged down... or at least for me.

Do you have any tips you'd like to add on?

Tuesday, January 31, 2012

Ways to save

One of the great things about owning a house is also the worst: you own a house.

Our house we bought a few years back is an older stick built home that has it's issues one of which is really bad windows.  Pretty sure they are made of thick pieces of plastic and gum.  Everyday I can feel air breezing through them and making it's way into our home... not a fan.

This winter I decided to do something about it.  I went to my local hardware store and picked up window insulation kits and I will show how I installed them and hopefully save you some time and irritation that I endured. 

You will need the appropriate number of kits (most kits do about 5 windows)
Damp rag (and I also used a tooth brush)
Scissors
Tape (just in case: great for patching a small burned hole in the plastic)
Hair dryer

First and foremost you will want to remove any curtains or blinds you have up to give yourself the free window.  Then wipe down all the surface: focus on clear and dust free corners: VERY IMPORTANT.


I used a old tooth brush to make sure that corners were free of debris.  Keep scissors handy at all times during this process


Next (after the paint is fully dry from the wipe down) use the adhesive that comes in your kit and roll your way around the window you will want to be about an inch of space from the actual window as to make sure the plastic has room to move if necessary.  After you have the tape exactly where you want it press down firmly and run your finger over the length of the adhesive (leaving on the cover).  Let sit for upwards of ten minutes the adhesive will adhere to the paint and stick much better if you allow between 10-20 minutes of rest before moving on.  I would start one window and move on to prepping a few then jump back over.
By Rachel Abi


Make sure that your tape over laps: you want no place for air to escape. 


Next measure out and cut the plastic to cover the window with an extra amount (about an inch or so) of plastic on each edge past where it will attach to the adhesive.


Slowly making your way around the window remove protective strip from outer line of adhesive.


Now it is time to attach the plastic

Start at the top center.  Slowly work your way evenly down the sides.  The lest extra and wrinkles you have the better but you also don't want it super taught (not that you will be able to get it really taught but as a warning just in case).


Some of my corners didn't adhere as well as you would hope I cheated and added some extra tape on the edge just in case the adhesive didn't hold.


Now it is time to use your hair dryer: when you start the process choose a corner and slowly work you way out.  Don't get the hair dryer too close or you will burn a hole but don't leave it too far or it won't do the trick (ie: don't go closer than 1").  When you start the window will start to look like the picture above.  Slowly working your way around the window the plastic will get clear and taught.


Till finally it is just like looking out a regular window and no one but you and your energy bill will be the wiser.

It is worth it in the end but it can take a while to get in your groove.  If you have to do two windows a day for a week: then it won't take up a chunk of the day. 

Thursday, January 26, 2012

Small touches

Fingers drum across pursed lips.  Feet pace back and forth in front of a huge display wall of light fixture.  I am LITERALLY the worst when it comes to decisions like this.  I stood there at that wall, knowing quickly what fixtures I didn't like but struggling as to what ones I would want to forever reside on my bathroom wall.  Yes, when Armageddon comes this light fixture will still be on the wall and I could never take it down and replace it if I decide later that I don't like it... well, at least in my mind that is how that works.

So I stand. . . and stand staring at a wall frozen unable to make a decision.  My phone is in my hand but unfortunately our local Lowes is the black hole of cell phone coverage.  

Finally after what seems like a half a day (not even close in reality) I have narrowed it down to three options and to finish it off I just chose the one that was on sale: thus is the epic of a story for what lead to this post.

It is amazing how a small thing can keep you down.  Putting up a light is not that big of deal.  It is literally twisting 3 sets of wires together yet somehow between going and picking it out and being sure enough to actually open the box it held us up in finishing our bathroom.

So what do you think of my choice?


After we finished the light we moved on to replacing the base board and quarter round.  Before we pulled up the floor I pulled off all the molding so that I could save it and use it again.  This was a bit more tedious then I would think but in the end not having the tools or wood to replace them it was easier and WAY cheaper.  Make sure you have sand paper though!  To make sure that when you repaint it comes across as a clean coat and not have weird layers on it.


Finally for this post and I feel most important: the toilet!

I was intimidated by the thought.  Not so much cause the process was difficult but more because of the implications if you get it wrong.  All the work, effort and money could be a waste if this one step didn't go right.  Such a simple process. . . seemed too simple but it wasn't.

Toilet base (check)
Wax ring (check)


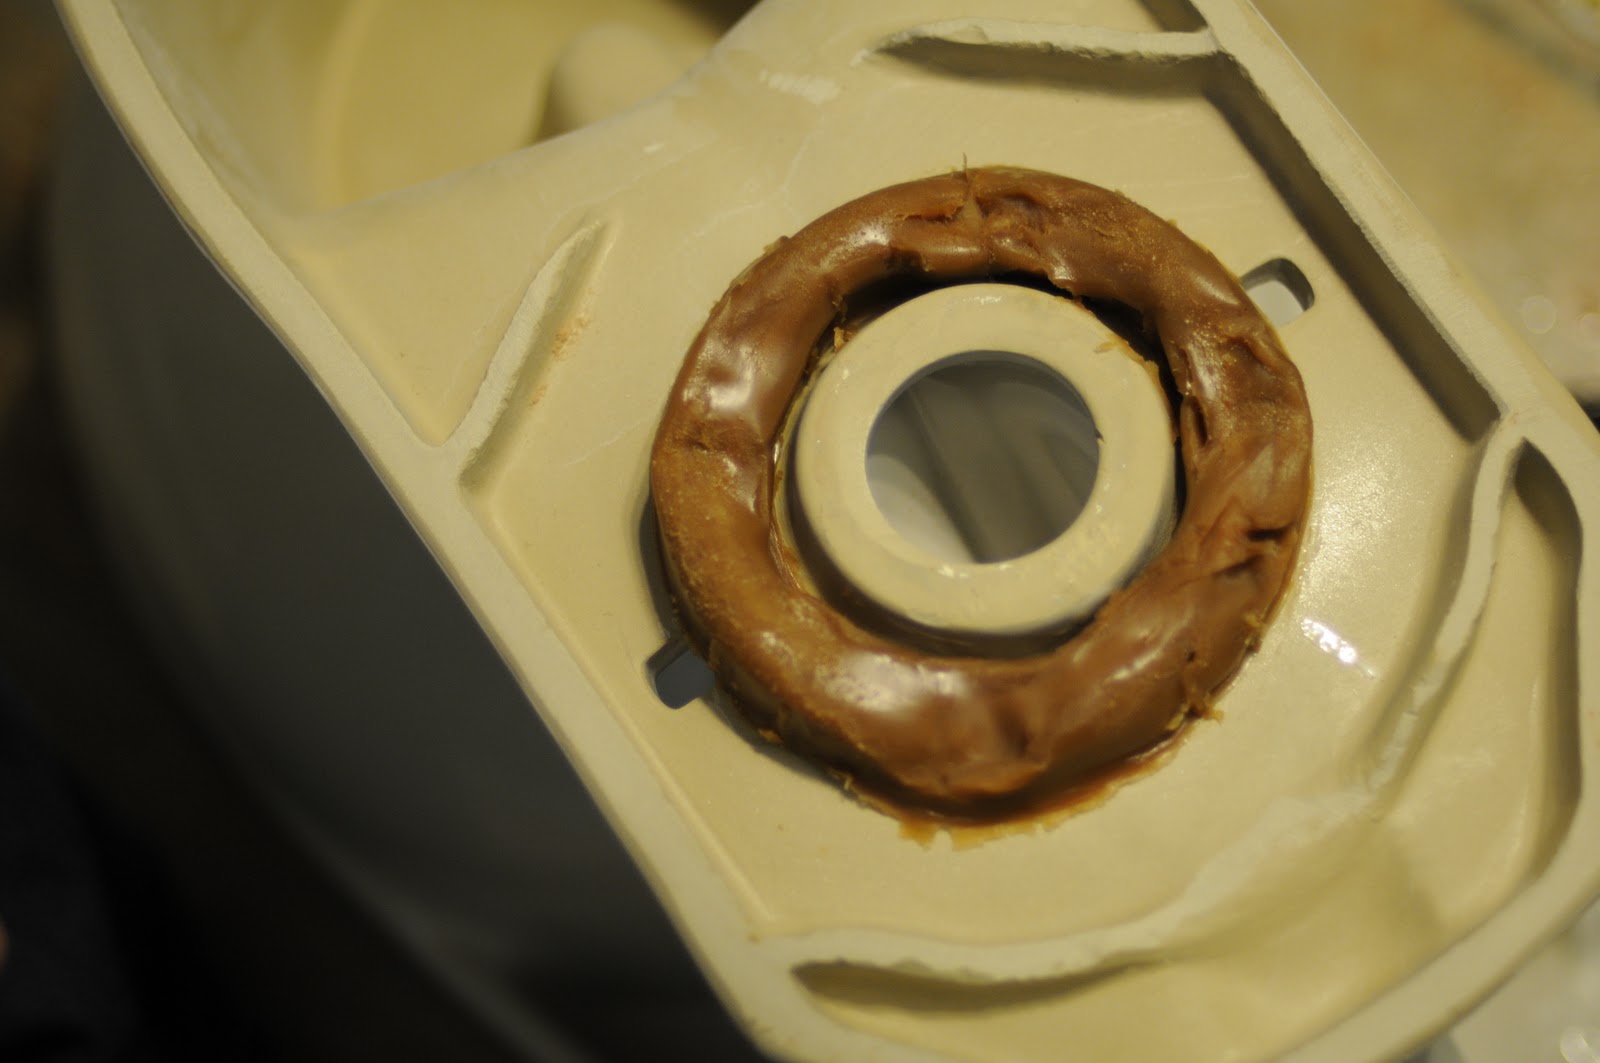
Flip the bottom of the toilet base up to face you and place the wax ring around the opening of the base of the toilet and push down hard (this is all on the wax ring packaging... not inventing even a part of the wheel).  The wax will come free from the plastic container.


Flip the toilet base over and match up the plumbing and holes and screws then. . . 

Drum roll please

Push down with all your weight.

Screw the bolts down as far as they will go then leave it for 24 hours.


Repeat the process the next day tightening the bolts down far then follow your toilet's instruction as to hook up the tank to the base.  (ours was pretty simple: two screws and one hose).


Finally: enjoy?

Tuesday, January 24, 2012

Cover up the baby

You'll notice on the last post about the bathroom it ends with it being blue... what is in my opinion a baby blue... not acceptable unless you have a baby AND it is in that baby's room... but that's just me.

 I really didn't like the blue that was chosen (long story but it was not my choice), so I had to take it down a notch thus the dark grey texturing on the walls.  I was in such a hurry to get that blue toned down that I completely forgot about documenting the process. 

Simply I did a linen weave look.  


MAKE SURE TO TAPE or you will have a huge mess on your hands.


Using a STIFF (really stiff) brush and do a light layer of paint (barely marking the walls) one direction (vertical or horizontal which ever you choose first).  


Let that dry and do the same thing the other direction...  
The process is very basic.  Patience is key to having an even spread and not have big globs!


Do you think it is an improvement?